How to Hide Wires with Skirting Boards and Trim?

Time:2026-10-17 Author:Oliver
0%

How to hide wires with skirting boards and trim is not merely a decorating question. It is a small electrical-safety project with visible consequences. A loose cable beside a doorway can catch on shoes, collect dust, or suffer repeated bending. A concealed cable can become harder to inspect. That trade-off deserves attention.

The National Fire Protection Association’s Home Structure Fires report continues to identify electrical distribution and lighting equipment among important contributors to residential fires. The U.S. Fire Administration also recommends reducing damaged cords, overloaded circuits, and unsafe cable placement. These findings support a careful method, not a rushed cosmetic fix. Skirting-board channels, dado rails, and removable trim can create clean routes. They should not replace proper cable protection, suitable fixings, or local electrical requirements.

Electrician and electrical educator Mike Holt often gives a blunt safety rule: “If you don’t know, don’t do it.” It fits this subject surprisingly well. Before cutting trim, identify the cable type, check its condition, and confirm whether it carries power, data, or audio signals. Never bury a damaged cable behind permanent finishes. Never trap it beneath sharp-edged moulding.

The practical details matter. Leave gentle bends near corners. Avoid crushing cables at door frames. Use a removable cover where future access is likely. A white cable may disappear against painted trim, while a dark cable may need a deeper shadow line.

Perfect concealment is not always the safest result. A tidy route can still hide a poor decision. This guide explains how to hide wires with skirting boards and trim while preserving access, protection, and a finish that looks intentional.

How to Hide Wires with Skirting Boards and Trim?

Assess the Room and Plan the Wire Route

Before hiding wires, inspect the room as a working site, not just a decorating project. Map every socket, light, device, doorway, radiator, and fixed cabinet. Measure the skirting board from corner to corner. Note uneven walls, loose sections, and narrow gaps near door frames. These details often decide whether the cable can sit safely behind the trim.

I usually mark the proposed route with low-tack tape first. Keep data cables separate from mains cables where practical, and avoid heat, damp areas, sharp edges, and places where furniture may crush the wire. Connections should remain accessible rather than being sealed permanently behind the skirting board.

If the route involves altering fixed electrical wiring, use a qualified electrician and follow local requirements. Do not nail or drill until hidden services have been checked.

The shortest route is not always the cleanest. A slightly longer path around a doorway may prevent tight bends and visible bulges. Leave gentle slack at corners and behind equipment. Test the temporary route before cutting trim.

My first sketch was too optimistic; the radiator reduced the available space by several centimetres. Recheck measurements after moving furniture. The trim must cover the cable without pressing it flat, while clips or channels should hold it firmly along the wall. A small gap at one corner can become obvious after painting.

Choose the Right Skirting Boards and Trim

Choose the Right Skirting Boards and Trim

The right skirting board should conceal cables without trapping them. Choose a hollow or two-part profile with a removable front section. This design leaves space for inspection and future changes. Measure the cable bundle before buying trim. A tight channel can crush insulation, especially around sharp corners. Leave a little spare capacity.

For television, internet, and speaker cables, low-voltage cable trunking behind the skirting is usually practical. Select smooth internal edges and rounded corners. Avoid mixing power and data cables in one narrow channel unless local standards permit it.

The NFPA report Home Fires Involving Electrical Distribution and Lighting Equipment, 2016–2020, recorded about 32,620 U.S. home fires each year. Poor routing is not the only cause, but heat, damage, and overcrowding deserve attention.

Mains wiring needs more care. Use approved conduit or a certified containment system, and ask a qualified electrician before altering fixed wiring. Local electrical rules may require protection, fire stopping, or specific access points.

Match the trim to the wall finish, but do not choose appearance over serviceability. White PVC may look ordinary. It is often easier to clean and replace. Timber can look warmer, though expansion may open small gaps.

I have seen neat installations fail because the clips were spaced too widely. The board bowed within months. Check the manufacturer’s spacing guidance, then test one short section before completing the room.

Prepare the Walls, Wires, and Installation Tools

Before hiding wires behind skirting boards or trim, prepare the wall carefully. Switch off the relevant circuit before touching existing electrical wiring. Use a cable and stud detector to check the planned route. Mark the path with a pencil, keeping it straight and away from likely drilling points. Remove dust, loose paint, and grease from the wall. A clean surface helps adhesive and fixings hold properly. Check for damp patches too. Moisture can weaken trim and damage cables over time.

Measure each wire route, including corners and door frames. Leave a little extra cable at both ends for adjustments. Separate power, data, and audio cables where practical, and never force several thick wires into a narrow channel. Damaged insulation needs replacement, not concealment. For fixed mains wiring, follow local electrical requirements and use a qualified electrician when necessary. I once measured only the visible wall section and ran short at the doorway. It was a small mistake, but removing fitted trim wasted more time than careful planning.

Prepare a tape measure, pencil, level, detector, fine-tooth saw, drill, suitable anchors, cable clips, filler, and touch-up paint. Dry-fit the skirting before applying adhesive or driving screws. Make sure the trim sits flat without pinching the wires. Keep removable sections where future access may be useful. Test the cables before closing the route, then secure them gently at regular intervals. Corners often expose poor preparation, so check each joint from standing height. The finish may look neat, yet hidden pressure can still cause trouble.

How to Hide Wires with Skirting Boards and Trim? - Prepare the Walls, Wires, and Installation Tools
Preparation Stage Task Recommended Details Tools or Materials Completion Check
1. Plan the Route Map the cable path before removing or cutting any trim. Use the shortest practical route along the wall perimeter. Mark cable entry and exit points, corners, outlets, and equipment locations. Measuring tape, pencil, chalk line, level, cable route sketch Route is visible and free from planned drilling points.
2. Identify the Wall Type Inspect the wall and existing skirting board. Check whether the wall is drywall, plaster, masonry, or wood. Confirm that the skirting board is thick and deep enough to conceal the cable or cable channel. Stud finder, inspection light, small probe, level Wall structure and fixing points are known.
3. Check for Hazards Locate hidden electrical, plumbing, heating, and data services. Do not drill or nail where concealed services may run. Switch off power before working near electrical wiring and verify that circuits are de-energized. Multifunction detector, non-contact voltage tester, circuit labels Potential hazards have been identified and avoided.
4. Measure the Cable Calculate the required cable length. Measure the complete route, including vertical drops and corner changes. Add approximately 10% extra length for routing and termination, without creating tight loops. Measuring tape, cable marker, cable ties or hook-and-loop straps Cable reaches every connection with moderate spare length.
5. Select Cable Protection Choose a suitable protective method. Use a purpose-made cable channel, conduit, or trunking where the cable may be crushed, abraded, or exposed to impact. Keep power and communication cables separated where required by local regulations. Paintable cable channel, conduit, grommets, clips, separators Cable is protected from abrasion and accidental impact.
6. Prepare the Skirting Board Remove or modify the trim carefully. Score painted joints before removal. Label each section and keep fasteners organized. If cutting a channel, keep sufficient material so the trim remains rigid. Utility knife, pry bar, oscillating tool or router, dust sheet Trim remains straight, stable, and suitable for refitting.
7. Prepare the Wall Clean and level the installation surface. Remove dust, loose paint, grease, and adhesive residue. Repair cracks or holes and allow filler or plaster to dry before applying adhesive or refitting trim. Brush, vacuum, scraper, filler, sandpaper, damp cloth Surface is clean, dry, sound, and reasonably flat.
8. Install the Cable Position the wire without stressing it. Follow the cable manufacturer's minimum bend-radius guidance. Avoid sharp bends, crushing, staples through the cable, and excessive tension. Keep connectors accessible rather than burying them inside a wall or trim. Cable clips, adhesive pads, conduit, fish tape, edge grommets Cable lies smoothly and connections remain accessible.
9. Fit the Trim or Channel Secure the skirting board, molding, or cover. Fix the trim to the wall or studs without piercing the cable. Leave enough room for the cover to close fully and avoid compressing the wire. Level, drill, wall plugs, screws, finishing nails, adhesive, caulk Trim is flush, secure, and does not pinch the cable.
10. Finish the Surface Close joints and conceal minor gaps. Use paintable caulk at visible joints and fill small fixing holes after the trim is stable. Allow filler and caulk to cure according to the product instructions before painting. Decorators' caulk, filler, putty knife, fine sandpaper, primer, paint Joints are smooth and the finish matches the wall.
11. Test the Installation Check the cable and connected equipment. Inspect for kinks, crushed sections, loose trim, exposed conductors, and excessive heat. Test continuity or signal performance using the appropriate tester for the cable type. Flashlight, continuity tester, network tester, signal tester Cable functions correctly and no visible damage is present.
12. Record the Route Document the concealed cable path. Photograph the route before closing the trim and note measurements from fixed reference points. Keep the record for future drilling, decorating, or repairs. Camera, measurement notes, floor plan, cable labels Future service locations are clearly documented.
Safety note: Concealing mains-voltage wiring must comply with local electrical regulations and may require approved conduit, suitable cable zones, additional protection, or work by a qualified electrician. Low-voltage cables should also be protected from crushing, heat, moisture, and sharp edges.

Install the Wires Behind or Inside the Trim

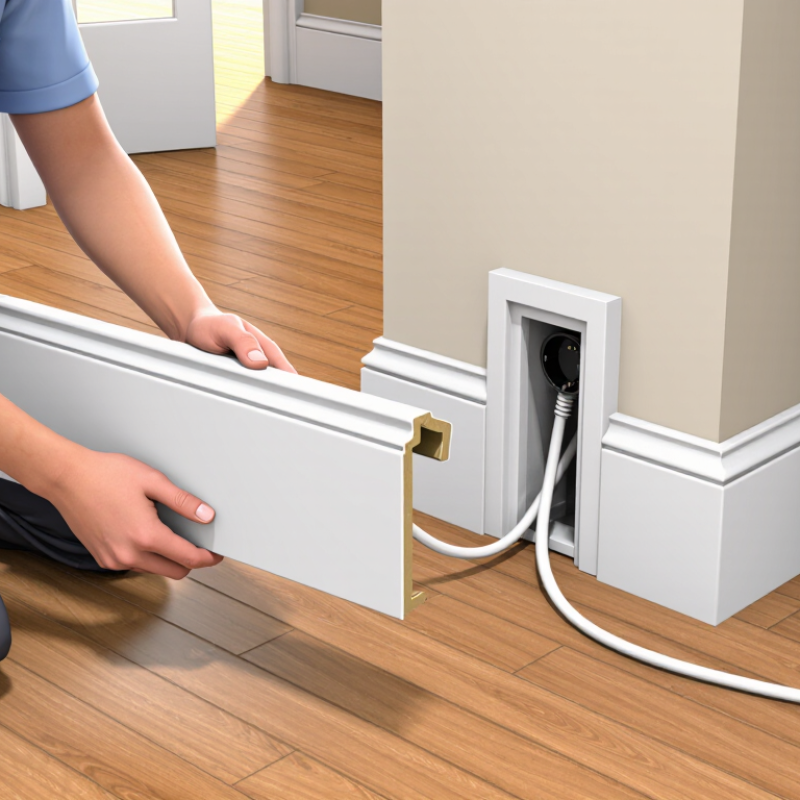
Skirting boards and trim can hide wires neatly when the cable route is planned before installation. Measure the wall, mark the outlet points, and choose a path with fewer bends. For low-voltage cables, a shallow channel behind the skirting board may work well. Remove the trim carefully with a wide scraper and protect painted surfaces with masking tape. Leave a little slack near each connection. Tight cables can pull loose later.

For mains wiring, never place a cable loosely behind trim. Turn off the circuit at the electrical panel and confirm that it is dead with a suitable tester. Use approved conduit or cable protection where required. A qualified electrician should handle new outlets, damaged wires, or concealed mains connections. My first attempt looked tidy, but I made the channel too narrow. The cable pressed against the trim and created a visible bump. I had to redo it.

Tips: Keep data and power cables separated when possible. Avoid sharp staples, tight bends, and hidden joins. Label both cable ends before closing the trim. Take a photo of the route first. It helps later. If the wall is uneven, use small spacers instead of forcing the board flat. Check doors and furniture before fixing everything permanently. A removable access section can save time during repairs. Always test the connection before replacing the final trim piece.

Secure, Finish, and Inspect the Concealed Wiring

Hiding wires behind skirting boards and trim can create a clean finish, but neatness must not replace safety. Plan the cable route before removing any trim. Keep wiring away from sharp edges, damp areas, heat sources, and likely nail points. Turn off the circuit, then verify that it is dead with a suitable tester.

Secure the cable with approved clips or channels, leaving no loose loops inside the cavity. Do not crush the insulation beneath tightly fitted boards. Use protective plates where screws or nails could reach the cable. Junctions should remain accessible, not buried permanently behind adhesive or filler. Local electrical rules may require specific cable protection, routing depths, or installation by a qualified electrician.

Finish the surface carefully. Sand rough timber edges, refit the skirting evenly, and use flexible filler only after checking the cable position. A small gap can reveal pressure on the wire. That detail matters. Inspect every fixing point before painting. Check that sockets, switches, and cable exits remain firm and undamaged. Test the circuit after the trim is secure, then inspect again when the room is fully furnished. Furniture can hide future access problems. It is tempting to rush the final inspection, especially when the wall already looks perfect. That is where mistakes survive. Photographing the route before closing the trim can help later, although measurements are still more reliable than memory.

FAQS

How should I plan a hidden cable route?

Map sockets, lights, doors, radiators, cabinets, and skirting boards. Mark the proposed path with low-tack tape. My sketch was wrong once; the radiator reduced the available space.

Is the shortest cable route always best?

No. A slightly longer route around a doorway may avoid tight bends and visible bulges. Leave gentle slack at corners. Do not force the cable flat.

Can I hide data cables behind skirting boards?

Yes, if the cable fits without pressure. Keep it away from damp areas, heat, sharp edges, and crushed furniture. Separate data and power cables where practical.

How should I prepare the skirting board?

Remove it carefully with a wide scraper and protect painted surfaces with masking tape. Use small spacers on uneven walls. Avoid forcing the board flat.

What safety checks are needed before drilling or nailing?

Check for hidden services before making holes. Do not drill near unverified electrical routes. Test the temporary cable path before cutting or fixing trim.

Can mains wiring be placed loosely behind trim?

No. Turn off the circuit and confirm it is dead with a suitable tester. Use approved protection where required. A qualified electrician should handle concealed mains wiring.

How can I keep the installation accessible?

Avoid hidden joins and permanently sealed connections. Leave a removable access section when possible. Label both cable ends before closing the trim.

What should I check before replacing the final trim?

Test the connection first. Check doors, furniture, corners, and visible bumps. Take a route photo. It helps later. Small gaps can become obvious after painting.

Conclusion

How to hide wires with skirting boards and trim begins with carefully assessing the room and planning the safest, shortest wire route. Consider the position of sockets, equipment, doorways, and corners before choosing suitable skirting boards, cable channels, or decorative trim. The selected materials should provide enough space for the wires without creating pressure, sharp bends, or visible bulges, while also matching the room’s style.

Before installation, prepare the walls, cables, measuring tools, cutting equipment, fixings, and any protective components. Route the wires behind or inside the trim, keeping them organized and away from heat, moisture, and areas where they could be damaged. Secure the trim firmly, conceal joints and cable openings, and finish the surface neatly with suitable filler or paint. Finally, inspect the entire route to confirm that the wires are protected, the trim is stable, and all connected equipment operates safely. For mains electrical work, use a qualified professional where necessary.

Oliver

Oliver

Oliver is a seasoned marketing professional with a wealth of expertise in driving brand awareness and engagement. With a deep understanding of our company's product offerings, he consistently delivers high-quality content that enriches our professional blog. His insights not only shed light on......